Saturday, December 10, 2011

Jen's Sketch Challenge December 2011

Time for another one of Jen Del Muro's monthly sketch challenges. This is the final sketch challenge for the year, but she has already announced on her blog that she will be doing monthly sketch challenges again in 2012. Yay! When she initially announced she was going from a weekly challenge to a monthly challenge I will admit I was disappointed but it's actually been really nice to only have one challenge each month. I love participating in challenges, but I don't have time to do one every week and if I need to make projects in between there are plenty of other sketches out there, or I can dig into my archives, or just get creative with my own layout :).

If you haven't played along this year, please join us next year. She's had wonderful prizes from some terrific sponsors and it's always fun to see what others do with the sketch.

Here's my contribution....I made this card for Kendall's 17th birthday. Since she's not a girly-girl I decided to go with this little punker and I cut out some skulls with my Cricut and added some bling to their eyes. It's a very fun little card. Enjoy!

Supplies
Patterned Paper - Papertrey Ink, Stampin' Up!
Cardstock - Stampin' Up!
Stamps - Digi Punk Girl - The Greeting Farm, Sentiment - Hero Arts
Copic Markers
Cricut Cartridge - Potpourri Basket
Bling - K & Co
Punches - Stampin' Up!
Dies - Spellbinders

Sunday, November 6, 2011

Jen's Sketch Challenge November 2011

It's sketch time! The always fabulous Jen del Muro has provided us with another fantastic sketch and another wonderful sponsorship! This month, the sponsor is Verve Stamps. I absolutely adore Verve! They have such elegant designs and some of the most beautiful sentiments with classy and gorgeous fonts. Their stamps are of the highest quality and give an excellent image every time! They also have a fantastic DT with some of the most talented designers you will find.

I decided to make a card for my mother's upcoming birthday. Although the sentiment doesn't scream "birthday" I loved it for her, because she does make me smile and really, who says just because a card is for a birthday that it MUST say, "Happy birthday?"

I used a new paper pad from Authentique that I recently purchased from Archiver's and I have to say that this is probably one of my favorite paper collections I have ever come across. I adore the designs and the color combination.....absolutely stunning! I used an image stamp from Verve to create my own design on a sheet of paper from the collection that had a little bit of distressing on it. On the flowers, I just dabbed a little bit of color, purposely making them uneven to give them a little more natural look.

Enjoy!


Supplies
Patterned Paper - Authentique
Stamps - Verve Stamps (image), Hero Arts (Sentiment, Heart)
Ink - Stampin' Up!
Gems - Michael's
Flowers - Prima Marketing
Paint - Lindy Stamp Gang
Stickles - Ranger Industries

Tuesday, October 4, 2011

Outside the Box

I visit countless blogs, watch crafting You Tube videos, participate in sketch challenges and still find myself making cards with very similar styles - patterned paper, lots of layers, an image stamp, and a sentiment. I wanted to do something outside the box (at least outside of MY box) and really loved the way this card turned out!

First off, I adore the bright yellow/turquoise combination and any card that includes butterflies on it is a winner in my book! This card took me literally just a few minutes to make, but it is so vibrant and interesting. It's not quite a single layer card, but it does NOT include any patterned paper, so that counts, right?

Supplies
Cardstock - Stampin' Up!, Bazzil Basics
Stamps - Hero Arts (image), Jillibean Soup (sentiment)
Ink - Stampin' Up!
Spray Ink - Lindy Stamp Gang
Ribbon - American Crafts

Jen's Sketch Challenge October 2011

Can you believe it's already October? Where did the summer go? October is actually one of my favorite months, but I wish that it did not mean winter was right around the corner. The evenings are starting to cool down and some days a light sweater is appropriate. My favorite thing about October is watching the leaves change. They are absolutely magnificent! I also love the smell of pumpkin candles and making soup and chili and looking forward to the holidays.

Jen del Muro gave us another fantastic sketch to work with this month. Go here to get all the details and play along. This month the sponsor is Waltzing Mouse Stamps. They have the most adorable stamps! Don't forget if you play along every month for the year, there is a chance to win a huge prize package.

For my card I decided to make a birthday card for my dad. I found this fantastic patterned paper last night at Archivers (did you go and get 43% off of all patterned paper????) Me either :).

Supplies:
Patterned Paper - Theresa Collins
Cardstock - Stamin' Up!
Stamps - Stampers Anonymous, Stampin' Up!, Papertrey Ink
Ink - Ranger Industries
Button - Basic Grey
Scrapper's Floss - Karen Foster Designs
Cricut Cartridge - Pack Your Bags
Zig Writer
Gel Pen

Tuesday, September 20, 2011

Jen's Sketch Challenge September 2011

It's that time again! Time for another sketch challenge from the fabulous Jen del Muro. I truly look forward to playing along with these sketches month after month. I love the rounded corners on this particular sketch! We are in the process of buying a house right now, so our priorities are paperwork and packing and that doesn't leave much time for crafting, but I had to make a card for my amazing sister so I decided to use this sketch for her card. I had fun with the pink and black color combination and don't you just love the polka-dots I created? So fun! I would like to play with this sketch again when I have more time, so I will be saving this one for future projects! I think this sketch would be fantastic for a baby card. Then again, wouldn't any sketch be fantastic for a baby card?

I must mention that this month's sponsor is Skipping Stones Design. Be sure to visit Jen's blog to play along!


Supplies
Patterned Paper - Stampin Up!
Cardstock - Stampin' Up!
Stamps - My Mind's Eye (images), Hero Arts (Sentiment)
Ink - Stampin' Up!
Embossing Powder - Stampin' Up!

Saturday, August 27, 2011

Jen's Sketch Challenge August 2011

Time for another one of Jen del Muro's amazing sketches! You have a couple of days left to play along to have an opportunity to win a prize from this month's sponsor Kraftin' Kimmie Stamps. You can see all of the details here.


I decided to make a birthday card for my new brother-in-law using this sketch. He eats, sleeps, lives and breathes baseball so it was very easy for me to decide on a theme for his card! I used my Cricut and these adorable star embellies from Theresa Collins to give it a little something special. I loved this sketch so much that I will be saving it and making some fun projects in the future.


Supplies
Patterned Paper - SEI
Stamps - Stampin' Up!
Ink - Ranger Industries, Stampin' Up!
Cricut Cartridge - Potpouri Basket
Star Embellishments - Theresa Collins

Monday, August 1, 2011

Sunshine and Laughter

I made this card for my step mom Valerie's birthday. I sat down with no design in mind. I don't do that often, but there are those times when I don't know what I'm going to do until I sit down at my table and cling onto something for inspiration. When I sat down to create this card, I started with the patterned paper. I love the sunny colors and the combination of the yellow with the teal. After choosing the patterned paper, I picked up m Storybook Cricut cartridge and decided to cut this flower (I have been eyeing this image for quite sometime.) As I was going through my flower bin I came across these resin flowers that I had forgotten all about. I absolutely love them and am so glad I came across them!

I need to go "shopping" in my craft room more often. I have so many products that I have never used and I need to get out of the habit of using the same products constantly and get outside of the box a little more and try new things! Like resin flowers. They are so yum!


Supplies
Patterned Paper - Crate Paper
Cardstock - Stampin' Up!
Ink - Stampin' Up!
Cricut Cartridge - Storybook
Resin Flowers - Prima
Stamp - Hero Arts
Corner Chomper - We R Memory Keepers

Monday, July 11, 2011

With Thanks

I don't know if this card could be considered CAS, but it is pretty clean and simple for me! There are not a lot of layers or a lot of stamping, but I think it turned out really elegant and beautiful. I wanted to make a special thank you card for Kendall's Learning RX teacher and I felt good giving such a special person this special card.

I let the patterned paper take center stage on this card and didn't add too much to it. I also took the opportunity to use some baker's twine and this gorgeous rose that has been sitting in my scrap room for about a month now. Sometimes simply stated cards can work so well! I must challenge myself to do more of these in the future.

Supplies
Patterned Paper - My Mind's Eye
Cardstock - Papertre Ink
Ink - Stampin' Up!
Stamp - Stampin' Up!
Baker's Twine - The Twinery
Mulberry Rose and Leaves - I am Roses
Punches - Stampin' Up!, EK Success


That's a NASCAR

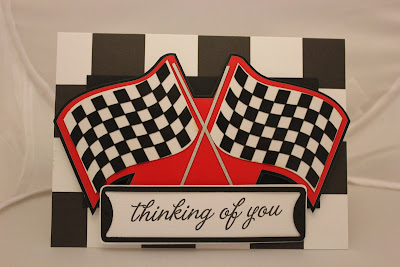
D2's (my step dad) 65th birthday was on July 2. My sister and mom went in on some tickets to a NASCAR race for a gift for him. The race is not until October, but he was surprised with the tickets for his birthday and has something exciting to look forward to. He loves auto racing (as does D1, coincidentally).....and we know he is going to have a blast. We cannot be there with him, but we sent a check to my sister to help pay for the tickets. My sister suggested a NASCAR themed card so I headed over to Archiver's to their themed scrapbooking area (I LOVE the way that store is organized....totally right up my alley) and found these adorable checkered flags in the sports section. This little flag embelishment pack also had the number 9 in it but I am not sure of drivers and their numbers since I am not into auto racing, so I left the number off and put the sentiment over the area where the number would go so that it didn't look so bare. I used my Cricut to cut out this license plate frame to hold the sentiment. I also found some checkered patterned paper to tie everything together.

Friday, July 8, 2011

Jen's Sketch Challenge 07-11

Time for another sketch challenge by the fabulous Jen del Muro. You can view the post for this month's sketch here http://iheart2stamp.com/2011/07/02/july-sketch-for-you-to-try/ (Blogger STILL refuses to allow me to add links correctly.)

I love the sketch for this month. In fact, I might do another card using this sketch very soon. It is so versatile...you can rotate it every which way and the possibilities with the little circle elements are endless.

The sponsor for this month is My Favorite Things and you have an opportunity to win some awesome prizes. I didn't se any MFT stamps because I don't own any (yet) but I am going to be placing an order soon. MFT has fantastic dies and very whimsical, fun image stamps.

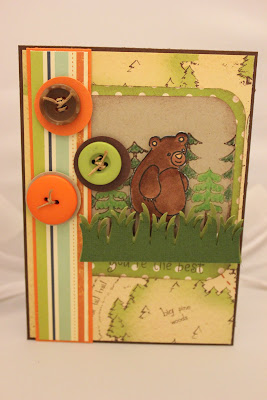
I decided to build a scene for this card. I will admit, I am not very experienced at building scenes in cards so I have a ways to go, but I had so much fun creating this scene and I was inspired to try this technique more and really strengthen my skills in this area. I always like to stretch myself and CAS cards and cards where you build a scene are the areas I need the most practice in.

I love the stamps and patterned paper I used on this card. I was at Archiver's about a week ago and saw this adorable bear stamp and had to get the tree stamp as well and then...and then.....as I was walking through the store I spotted this paper from October Afternoon and knew I had to get some paper to go with the stamps. I didn't buy the entire collection because I don't see myself making a lot of cards or scrapbook pages with a camping theme, but I did pick up a few pages and they are all absolutely adorable. If we had some camping pictures from a recent trip I would most definitely be creating a mini out of these papers!

Anyway, I hope you enjoy.


Supplies
Patterned Paper - October Afternoon
Cardstock - The Paper Co, Stampin' Up!, Papertrey Ink
Ink - Stampin' Up!, Tsukineko
Stamps - Imaginisce (Image), Hero Arts (Sentiment)
Buttons - Basic Grey (Orange, Green) Unknown (Brown)

Scrapper's Floss - Karen Foster Designs

Cricut Cartridge - From the Nest
Copic Markers - E33, E25, E27, E29
Prisma Color colored pencils

Wednesday, June 22, 2011

Happy Father's Day

I have been blessed with 3 wonderful Dad's. My father, my step father, who has been in my life since age 6, whom I affectionately refer to as D2 (as in dad #2) and my father-in-law who passed away in 2007. My time with my FIL was cut way too short, but I feel so honored that I got to share my life with him, even for a short time.

Due to our crazy schedules, I didn't have much design time, so I cheated a bit and made two of the same card for both D1 and D2. I had to play arond with the card quite a bit before I got it right. I started with a very flat card and wasn't excited about it, so I used some dimensional adhesive and created this fantastic shadow behind the airplane to give it some motion and was very happy with the way the end product turned out. I also added some dew drops to the clouds, which added a little bit of whimsy to the card, but also added some additional dimension. Both dads were very happy with their cards and appreciated that they were handmade.

That's what I love about our hobby....we get to share it with others and something that we enjoy so much brings other people much pleasure. It is a win-win!


Supplies
Patterned Paper - My Mind's Eye
Cardstock - The Paper Co.
Stamp - Stampin' Up!
Ink - Stampin' Up!
Cricut Cartridges - Heritage, Potpouri Basket
Dew Drops - Cloud 9 Design

Tuesday, June 14, 2011

My Little Stamping Space

Christina at Creations with Christina has started a little feature on her blog called, "Show us your....." and this week, it is show us your craft space. You can see the post here http://www.creationswithchristina.com/2011/06/show-usyour-craftspace.html. I think I originally discovered Christina's blog when I was searching You Tube for PTI videos. Christina has some fantastic Cricut tutorial videos and this new feature on her blog is such fun!

I am always on the lookout for new storage ideas for my little stamping space and since I love to organize, the more organized my space can be, the better.

I took these photos at night, so the lighting isn't great, but you at least can get an idea of what my space looks like. I am really so very thankful to have my own room to dedicate to papercrafting. In our old house, I had a corner in the living room so this space is such a treat for me! I love to hole up in my room with my pretty decorations and put on some music or a DVD and get lost in creativity. It really is my own little sanctuary.

Shot of the room from the doorway. The desk at the end of the room is where my laptop lies.


My table and plastic storage drawers. That Archiver's bag at the end of the table holds new supplies that are waiting to be used and projects that I have yet to begin. I only have one chair in the room so I just move it to the table when I'm crafting and back to the desk when I'm working on my laptop. I have the table facing the center of the room so that I'm not staring at the wall when I'm working and I can watch movies while I'm working.


I love this part of the room! The white drawers hold all of my cardstock. I forgot to take a shot of the open drawers.


Shelves on the wall with decorations I got at Hobby Lobby. The two jars hold all of my PTI buttons.


I got this paper cart at Costco and it holds blank cards, envelopes, die cuts, patterned paper, and scraps. Lots and lots of scraps. And some more scraps....which I try to use regularly but still my scrap drawers runneth over.


I got this little shelving unit and canvas drawers from Target. The center shelf holds magazines for inspiration and the bottom canvas drawer holds all things Cuttlebug - embossing folders, dies, and Nestabilities as well as all of the plates.


The top drawer holds all of my flowers. I recently got my first order from I am Roses....oh my! They are so gorgeous!


This is a little hardware unit I bought at Walmart and I use it to store all of my buttons (color coordinated, naturally) with the exception of my PTI buttons and other hardware - brads, clips, etc. I love this little unit.


I got this adorable hat boxes at Hobby Lobby. The top hat box holds all of my chipboard and the bottom box holds pamphlets, instructions for various tools, mini catalogs from Stampin' Up! and other papers that I want to hide.


My Stampin' Up! ink and Stickles, Alcohol Inks, Re-Inkers, and glitter.


This caddy is not the Making Memories model that everyone has. I was late to the game but found this one at Michael's and I actually think I like it even better. I have all of the tools that I need right at my fingertips and it is very easy to find what I need.


Prisma markers, decorative edge scissors, glimmer mist, Lindy Stamp Gang Starburst stains, and Perfect Pearls.


Embossing powders, paint, Glossy Accents, stamp cleaning supplies.


This unit is by Simply Renee (makers of the Clip it Up unit) and I absolutely love it, but have completely outgrown it. I have an entire drawer that is overflowing with ribbon. I have a thing for ribbon. Apparently.


Unity Rubba Rack!


This is where I store all of my Unity Kit of the Month kits. I was a member for about 18 months and then found that I had so many stamps I had never inked up that I needed to stop but if you haven't tried the kit of the month from Unity, I highly recommend it! Their stamps are super good quality and they are whimsical and classy and elegant and hilarious.....something for everyone every month! This basket holds my kits perfectly. I also have this Fancy Pants stamp set thrown in there because it's too big to fit anywhere else. That is how I roll.


This drawer cart mainly holds stamps, with a drawer of ink pads on the top. Here's an open shot to give you an idea. I am loving the new unmounted rubber from Stampin' Up! now. Anything to save space is ok with me!

In the other drawer cart I have embelishments, alpha stickers, my ribbon overlfow, colored penciles, embossing gun, a few punches.....a bit of this and that.


My punch storage. I am pretty much only buying edge punches now that I have my Cricut. I find between the Cricut and Nestabilities dies, I have very little need for punches with the exception of edge punches.


My Copic storage. I found this unit at Hobby Lobby for $10 and then used a 40% off coupon. It holds a lot and fits perfectly on the top of my desk. It's just right for me.

Inside my closet. This is a shelving unit that holds Cricut cartridges, a few idea books, some scrapbooks, and misc office supplies like paper and CD's.


Also in the closet - this little unit holds tags, extra sponges, and extra adhesive. I like to be prepared :)


On the top shelf of my closet I store my holiday stamps. I was running out of room in the drawer cart so I moved the holiday stamps that I only use at certain times of the year to these storage bins and I find this system works much better for me.


Thanks for stopping by!

Sunday, June 12, 2011

Jen's Sketch Challenge 06-11

I so look forward to the first Saturday of the month, because Jen del Muro releases another sketch challenge. For this week's challenge, visit this link http://iheart2stamp.com/2011/06/04/june-sketch-for-you-to-try/ (Blogger is still not letting me insert links using the linking tool....oy!) This month's sponsor is Your Next Stamp. I primarily used my Cricut for this card, with the exception of one stamp that I used along with some embossing to add a little interest to one of the larger panels.

My dear, sweet, wonderful, brave friend Rhonda is on her way to Kuwait. She is a soldier and has a strong desire and need to head to the desert to do her duty. She is an honorable American and we are praying for her safety and the safety of all of the men and women that are overseas fighting for our freedom. It is because of these brave individuals that we get to live life as a free people and I never want to take for granted the life that I have because of those that have fought to make this country what it is.

We had a going away dinner for Rhonda last week and I made this card for her. I want her to know that she is my hero and I am so thankful for her as a friend, but also as an American. God has blessed this country and I pray that He will bless those that sacrafice for us every day.

Supplies
Cricut Cartridge - Stand and Salute
Cardstock - The Paper Co
Card Base - The Paper Co
Fiber - The Twinery
Embossing Folder - Provo Craft
Stamp - Stampin' Up!
Ink - Versamark
Emobssing Powder - Stampendous

Tuesday, June 7, 2011

Jonny Diaz - More Beautiful You

I absolutely love this message to young girls/women. There could never be a more beautiful you...here are the lyrics. They speak for themselves.

Little girl fourteen flipping through a magazine Says she wants to look that way
But her hair isn't straight her body isn't fake And she's always felt overweight
Well little girl fourteen I wish that you could see That beauty is within your heart
And you were made with such care your skin your body and your hair Are perfect just the way they are
There could never be a more beautiful you
Don't buy the lies disguises and hoops they make you jump through
You were made to fill a purpose that only you could do
So there could never be a more beautiful you

Little girl twenty-one the things that you've already done Anything to get ahead
And you say you've got a man but he's got another plan Only wants what you will do instead
Well little girl twenty-one you never thought that this would come You starve yourself to play the part
But I can promise you there's a man whose love is true And he'll treat you like the jewel you are

So turn around you're not too far
To back away be who you are
To change your path go another way
It's not too late you can be saved
If you feel depressed with past regrets
The shameful nights hope to forget
Can disappear they can all be washed away
By the one who's strong can right your wrongs
Can rid your fears dry all your tears
And change the way you look at this big world
He will take your dark distorted view
And with His light He will show you truth
And again you'll see through the eyes of a little girl


Monday, May 30, 2011

You Rock!

Making cards for teenagers is another challenge (maybe even more difficult than masculine cards.) The card has to be cool, not geared toward someone too young, and suited to the taste of the recipient.

My beautiful step daughter Nicole was just promoted to 9th grade and Jay and my MIL drove across Kansas to be there. Kendall and I had to stay back (boo!) because Kendall had finals and we had to go to Learning RX every night. The weather was absolutey awful during their trip (downpours, hail, tornado warnings....) but they made it and were able to be there to support Nicole and made it home safely. It meant so much to Nicole to have them there, which totally made it worth it and they created lasting memories.

Here's the card I made for her. I used this adorable Grunge stamp set I recently purchased from Papertrey Ink. It was my first PTI stamp set and the quality is incredible! I absolutely love everything from them that I have purchased (I am already hooked on their ribbon and CS) and love the versatility of their stamp sets. As soon as I saw the Grunge stamp set, I knew I had to purchase it to make cards for the girls. Nicole's favorite color combination is black and pink, so I just did a single layer card and played with the stamps. I added a few nail heads for a little added interest. I think the card is fun and cool and perfect for our little (big) graduate!

Supplies
Card Base - The Paper Co.
Ink - Stampin' Up!
Stamps - Papertrey Ink
Nail Heads - Mark Richards

Masculine Card Idea

Why is that masculine cards are so difficult to design? Perhaps it's because of the abundance of floral patterned paper and gorgeous ribbon, elegant Prima flowers, and cutesy stamps? Sure you can make a masculine card out of some plaid paper (yawn) or just use some cardstock and a sentiment, but men deserve a card that required creativity as much as ladies do! I have had quite a few occassions recently where I needed a masculine card, so I have been flexing my creative muscles.

I made this card for my brother's birthday. He is not an army guy (although this card would be great for one!) but I wanted to make a masculine card for him and when I spotted this camouflage design in my Stars and Stripes Cricut cartridge, the idea struck me.

I started with some Sahara Sand cardstock from Stampin' Up! and then sponged on some Vintage Photo Distress ink to give it a dirty, sandy look. Then I cut the Camouflage pieces out of Always Artichoke cardstock from Stampin' Up! and then sponged the edges.

The dog tag was cut using the same cartridge, also out of Sahara Sand cardstock. After I cut the piece out, I used some Chocolate paint from a Ranger Spone Dauber and painted the entire piece, including the chain. Then I sprayed it with Caramel Apple Tattered Angels glimmer mist to give it a metalic look. The initials came from a sticker sheet from Basic Grey (Ambrosia collection.) They were a light cream color that almost had a pink tint to it, which obviously would not work on this macho card, so I painted them with some more Ranger paint using a paintbrush. I wanted them to have a bit of sparkle as well, so I painted them with some bronze Perfect Pearls. I was happy with the final results and will be playing with the images on this cartridge again soon!


Close-Up


Supplies
Cardstock - Stampin' Up!
Cricut Cartridge - Stars & Stripes
Paint - Ranger Industries
Glimmer Mist - Tattered Angels
Perfect Pearls - Ranger Industries
Stickers - Basic Grey
Ink - Ranger Industries

Saturday, May 28, 2011

Life is Good

I made this card several months ago for my brother-in-law. I always have a heck of a time coming up with designs for masculine cards, but Graphic 45 to the rescue!!!! Who doesn't love the gorgeous designs by Graphic 45? Each sheet of paper is a complete work of art and one of my favorite collections is A Proper Gentleman. It is a classic collection reminiscent of days when men wore top hats and opened doors and treated women like true ladies. I love how far women have come in the work place and the opportunities we now have, but I do miss the days when men would stand up when a woman got up to go to the restroom (my husband still does that, by the way) and would hold doors open and take the hand of a lady when walking in the rain. This collection reminds me of those days.

I also love the pocket watches! When my husband and I got married, we got pocket watches for our best man and groomsan, which happened to be my father-in-law and brother-in-law. My father-in-law passed away 4 years ago and we miss him every day, but whenever I see a pocket watch, I think of him and my heart sings.


Supplies
Patterned Paper - Graphic 45
Stamps - Stamper's Anonymous, Verve Stamps
Ink - Ranger Industries, Stampin' Up!
Hardware - Tim Holtz
Nestabilities Dies
Embossing Powder - Ranger Industries

Wednesday, May 25, 2011

Bare Essentials

I have been battling a rash around my eyes since sometime in November. I had never experienced anything like it in my life. I hadn't changed skincare products, had not used new make-up, didn't change linens or laundry detergent, hadn't changed my diet....nothing had changed yet I had this inexplicable rash around my eyes. I went to my PCP and he prescribed some hydracortizone cream and told me to apply it twice a day. The rash redness and swelling would lessen, but the rash would never go away entirely. After several months the rash was still present and the flare-ups got worse. I called my PCP and he was booked solid, so he sent me to urgent care. I saw a MD there and he prescribed steroids and antibiotics. I took everything as prescribed and the symptoms lessened again, but then they came back worse than ever. After several weeks and lots of experimentation (stopped wearing make-up entirely, switched to all natural face wash, eye cream, eye make-up remover, changed the sheets on the bed from the flannel winter sheets to the cotton summer sheets, stopped washing my face with Dove in the shower....everything I could think of), I was beyond frustrated and discouraged. I was tired of having swollen skin around my eyes, tired of not being able to wear eye make-up, tired of not feeling beautiful. I had lost 15 pounds and fitting into my skinny jeans, but my eyes (my best feature) looked horrible. I called my PCP again and he gave me a referral to see a dermotologist. He sat down, asked me questions, talked to me, and made me feel important to him. I am not used to that treatment from Tricare doctors, but this doctor was special. After our conversation, he diagnosed me with a rare form of rosacea that normally affects the area around the mouth. I read the symptoms on the pamphlet he gave me and was confident he was right. He prescribed some medication and cream (non steroid cream) and now 3 weeks later it is almost completely gone and I have not had one flare-up. I go back to see him in a week and to give him a big hug!!!!

Along my journey to solve the problem on my own, I decided to try some all natural face care products. Perfume free, chemical free, gentle products that my sensitive, difficult skin would agree with. I decided to try the Bare Minerals skincare line. My dear friend Kim swore by it and I have heard nothing but positive reviews from friends and family using any Bare Minerals products.

Initially I thought it was just ok. The cleanser lathers real well and you only have to use a drop, but the moisturizer didn't feel like it was going to keep my skin from drying out. Well, after a couple of weeks I understand why Kim loves these products so much. My skin looks younger. It is softer, it is smoother, it is even toned and it feels clean all the time. I still haven't worn foundation since January (I had stopped to try to help my eyes heal) and now I don't even need it. I wear a little bit of powder and some blush and my skin looks fantastic. The products are a little more expensive than the OTC Oil of Olay products I was using, but they are well worth it. The cleanser will last forever because you have to use such a small amount, but I am going through the moisturizer quite rapidly. I use two pumps in the morning and two pumps in the evening. Living in Colorado requires me to use extra moisturizer on my skin but that is the case no matter what product I use.

I am not here to endorse products, but when I find something I especially like, I want to share it with others. And this is a skincare line that has made a huge difference in my skin. I am 40 years old and my skin doesn't look a day over 30. Part of that is genetics and sunscreen, but I honestly have noticed a huge difference since switching to Bare Minerals.

I hope you will give them a try!


LinkWithin

Blog Widget by LinkWithin